
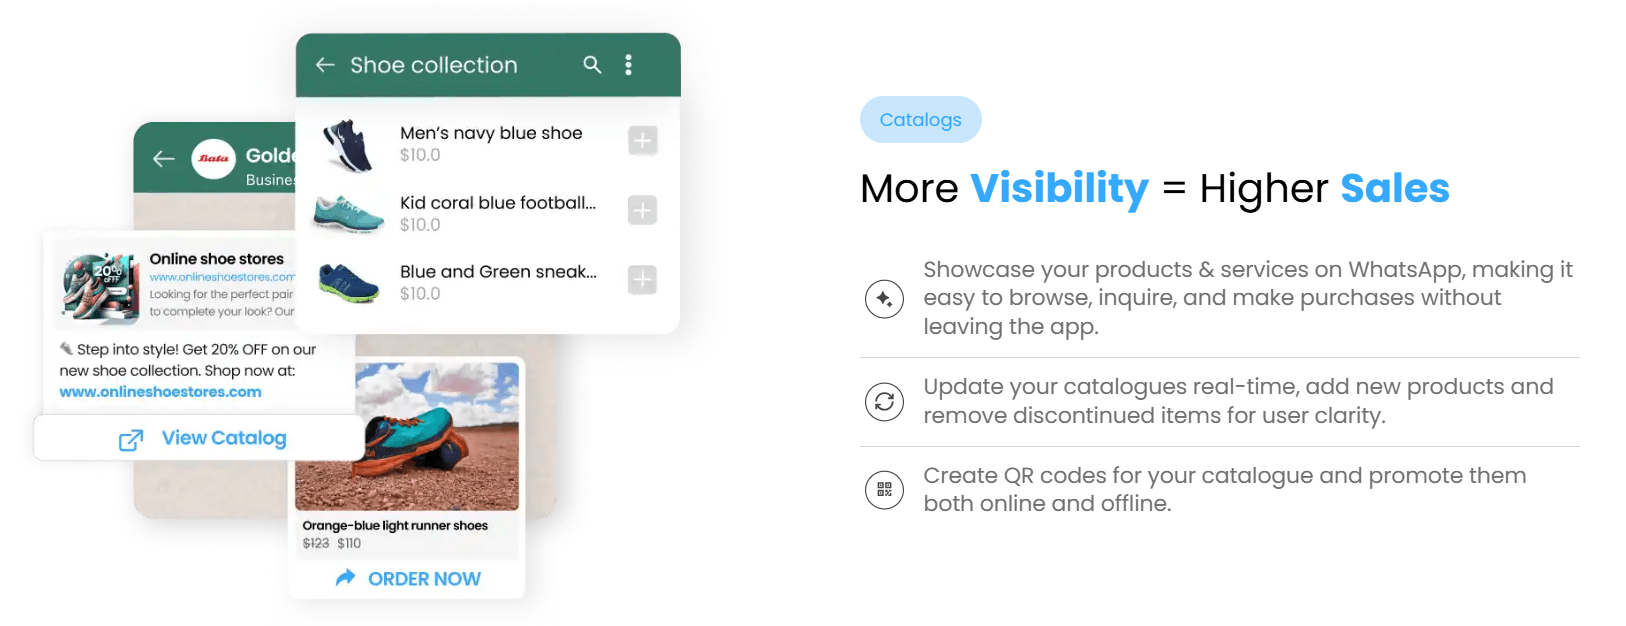
Having a WhatsApp Business account is a great start, but to truly stand out, you need a WhatsApp Catalog. A catalog transforms your profile into an interactive storefront, allowing customers to browse and select products or services without engaging in back-and-forth conversations.
In this blog, we’ll explore WhatsApp Catalogs—what they are, why they matter, and how to set up one effectively. We’ll also discuss key features, collections, and strategies to maximize your sales.
What is a WhatsApp Catalog?
A WhatsApp Catalog is a digital showcase of your business’s products and services within the WhatsApp Business app. It allows customers to browse, discover, and select items of interest effortlessly. Each product or service in the catalog comes with essential details, making the shopping experience seamless. There are 2 ways to setup your WhatsApp Business Catalog. You can setup a basic catalog via WhatsApp Business, but to setup a more comprehensive and attractive catalog, you would need to set it up via an API Service Provider like Heltar.
Key Fields in a WhatsApp Catalog
To optimize your catalog, ensure that each product or service entry includes:
Title (required)
Price (optional, available in certain countries)
Description
Website Link
Product Code
Up to 10 Images or Videos
Providing detailed product descriptions and media improves customer engagement and conversions.
Method 1 - How to Set Up a WhatsApp Catalog on WhatsApp Business
Setting up a WhatsApp Catalog is easy and can be done via mobile (Android/iOS) or WhatsApp Web.
For Android & iOS:
Open WhatsApp Business App
Go to More Options > Settings > Business Tools > Catalog
Tap Add New Item and upload images or videos (up to 10 per item)
Enter the product/service details (name, price, description, etc.)
Tap Save to add the item to your catalog
For WhatsApp Web:
Open WhatsApp Web and go to Menu > Catalog
Click Add New Item
Upload images from your computer
Enter product/service details
Click Add to Catalog
Your catalog items are subject to review. Once approved, they become visible to customers. You can also edit, delete, or hide/unhide items as needed.
Creating and Managing WhatsApp Collections
A WhatsApp Collection allows businesses to organize their catalog into categories, making it easier for customers to browse.
How to Create a Collection:
Go to WhatsApp Business App > Catalog
Select Add New Collection
Name your collection and select products/services to include
Tap Save
Collections are subject to WhatsApp’s review policy before becoming available to customers.
What to Do If Your Collection Gets Rejected?
If a collection is rejected, you can appeal by:
Selecting the rejected item
Tapping Request Another Review
Entering a reason for the request
Tapping Continue
Once approved, your catalog will be live and ready for customer engagement.
Sharing Your WhatsApp Catalog
Businesses can share their catalog links directly via chat or social media platforms.
How to Share a WhatsApp Catalog Link:
Open the Catalog
Select the product/service you want to share
Click the Share Icon
Choose the contacts, groups, or platforms to share with
Tap Send
This feature helps businesses increase visibility and sales by making product discovery seamless.
Method 2 - Setup Catalog via WhatsApp Business API
While the WhatsApp Business App provides a good starting point, the WhatsApp Business API takes it to the next level. Key benefits include:
Automated Catalog Sharing: Send personalized product recommendations based on customer preferences.
Integration with Marketing Campaigns: Use catalogs in ongoing or one-time promotional campaigns.
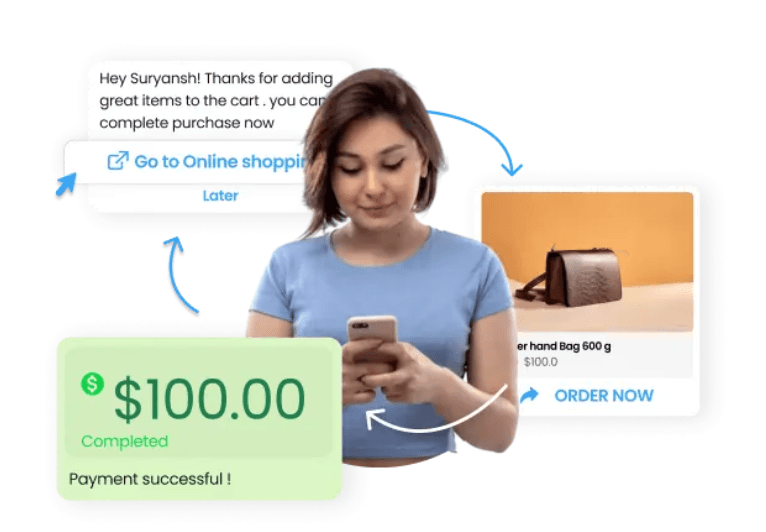
Seamless Checkout & Payments: Enable direct purchases within WhatsApp, eliminating friction in the buying journey.
How to setup a Catalogue using Meta Commerce Manager
Depending on your business, you can create a catalogue for:
- Products sold online (suitable for most businesses)
- Travel (hotels, flights and destinations), automotive, property, or local products and services
Note: Where possible, we recommend that you use one catalogue instead of creating multiple catalogues to help improve performance.
Before you begin
- Create a Facebook Page for your business if you don't have one yet.
- Create a business portfolio in Business Manager (previously called a business account) so you can assign your catalogue to your business. Make sure that you have full control of your business portfolio.
Create a catalogue for products sold online
To create a new catalogue and start setting it up:
- Go to Commerce Manager.
- If this will be your first catalogue, click Get started. Select Create a catalogue and click Get started.
- If you already have one or more catalogues, you'll see them listed. Select + Add catalogue to create a new one.
- Make sure that Online products is selected. This is the default option.
- If you already host your products on a partner platform that has an integration with Meta, toggle on Connect a partner platform. Select a platform from the drop-down menu and follow the link to its website to complete setup and sync products to Commerce Manager. Learn about importing products from a partner platform.
- Select the business portfolio that your catalogue will belong to. To select a business portfolio, you must have full control of it.
- Enter a name for your catalogue. Click Next.
- Connect a Meta pixel or app SDK to your catalogue so you can run Meta Advantage+ catalogue ads that show people relevant products from your catalogue based on their interests:
- If you already have a pixel or SDK implemented on your website or app that you want to connect, turn on the toggle beside it and click Next.
- If you prefer to connect a pixel or SDK later, click Skip.
- Assign permissions for who can work on your catalogue:
- To assign people, click People and then + Assign people. On the left, select the person's name. People must be added to your business portfolio to appear in the list. On the right, select Partial access or Full control and click Assign.
- To assign a partner business (such as a marketing agency), click Partners and then + Assign partner.
- If you know their business ID, select By business ID (here's how they can find their business ID). Enter the ID and select Partial access or Full control. Click Close and then Next.
- If you want to send them an invitation link, select By link to share. Select Partial access or Full control. Copy the shareable link that you generated and send it to them. Each link can only be used once and expires in 30 days. Click Close and then Next.
- If you prefer to assign catalogue permissions later, click Next.
- Choose how to add products to your catalogue:
- Connect to a data feed: Upload a spreadsheet or XML file from your computer or a file hosting website to add products in bulk. You can upload a file once or set up scheduled uploads to happen hourly, daily or weekly. Learn how to upload a data feed.
- Manually add your products: Fill in a form to add products. Learn how to add products manually.
- If you prefer to add products later, click Skip.
You've created a new catalogue.
To set this up, you need to get in contact with a WhatsApp API Service Provider like Heltar.
Final Thoughts
A WhatsApp Catalog is a powerful tool for businesses looking to streamline their shopping experience. By leveraging features like collections and WhatsApp Business API, you can enhance customer engagement and drive more sales.
If you’re serious about scaling your business, consider upgrading to a WhatsApp Business API provider. Explore the benefits firsthand with a free trial and see how it can transform your business operations.