Every business already uses WhatsApp to talk to customers, but when it comes to calls, most teams are still stuck with agents dialing numbers one by one, chasing follow-ups, and logging results by hand. It’s slow, expensive, and error-prone.
Now imagine the same work handled automatically, calls going out in bulk, leads qualified in real-time, reminders delivered in natural voices, and every outcome logged neatly in your dashboard. That’s exactly what Heltar’s Voice API Bot does. It turns calling into a fully automated, trackable process you can run at scale.
Heltar Voice API Bot, Automated AI calls on autopilot
Heltar now lets you run voice bots over WhatsApp. It speaks in a natural voice, follows your script, and logs every step. This write-up expands on each screen you shared so anyone can set it up without guesswork.
Core ideas in one minute
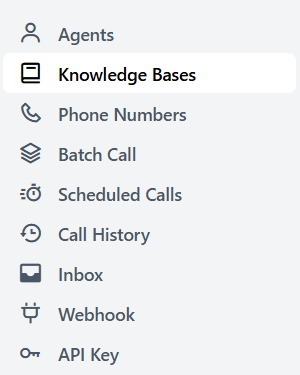
Agents are your bots. Each has a model, a voice, and phone mappings.
Phone Numbers hold your rented numbers. You link agents to these for outbound and inbound.
Batch Call sends large campaigns from a CSV and tracks the funnel.
Scheduled Calls shows what is queued.
Call History is your full log with rich filters and Export as Excel.
Inbox lists inbound calls as they come in.
Webhook, API Key, API Documentation let your systems start calls and receive events.
Your AI Agents

Where: Agents in the left menu
What you see: a table with these columns
Agent Name
Model, for example gpt-4.1, gpt-4.1-mini, gpt-4o-mini
Voice, for example Jessica, Raju - Relatable Hindi, Anika - Animated, Amit Gupta - Energetic, Anjali - Soothing Hindi
Outbound Phone Number
Inbound Phone Numbers
WhatsApp Phone
How it works
One agent can place calls from its Outbound Phone Number.
A number can have many outbound agents using it, but an Inbound Agent is one per number at a time. Calls coming into that number go to this agent.
WhatsApp Phone maps the WhatsApp identity for that agent. If it says “Not Selected”, click to set the right WhatsApp phone so users see a consistent caller identity.
Tips
Use mini models for short, structured calls like OTP checks or order confirmation.
Use full models for open questions or multi-turn talks.
Keep separate agents for language, tone, and use case. The list view makes this easy to manage.
Creating an Agent
The Create Agent page is where you design and configure a new voice bot for WhatsApp calls. This is the starting point for giving your bot a role, voice, and behavior.
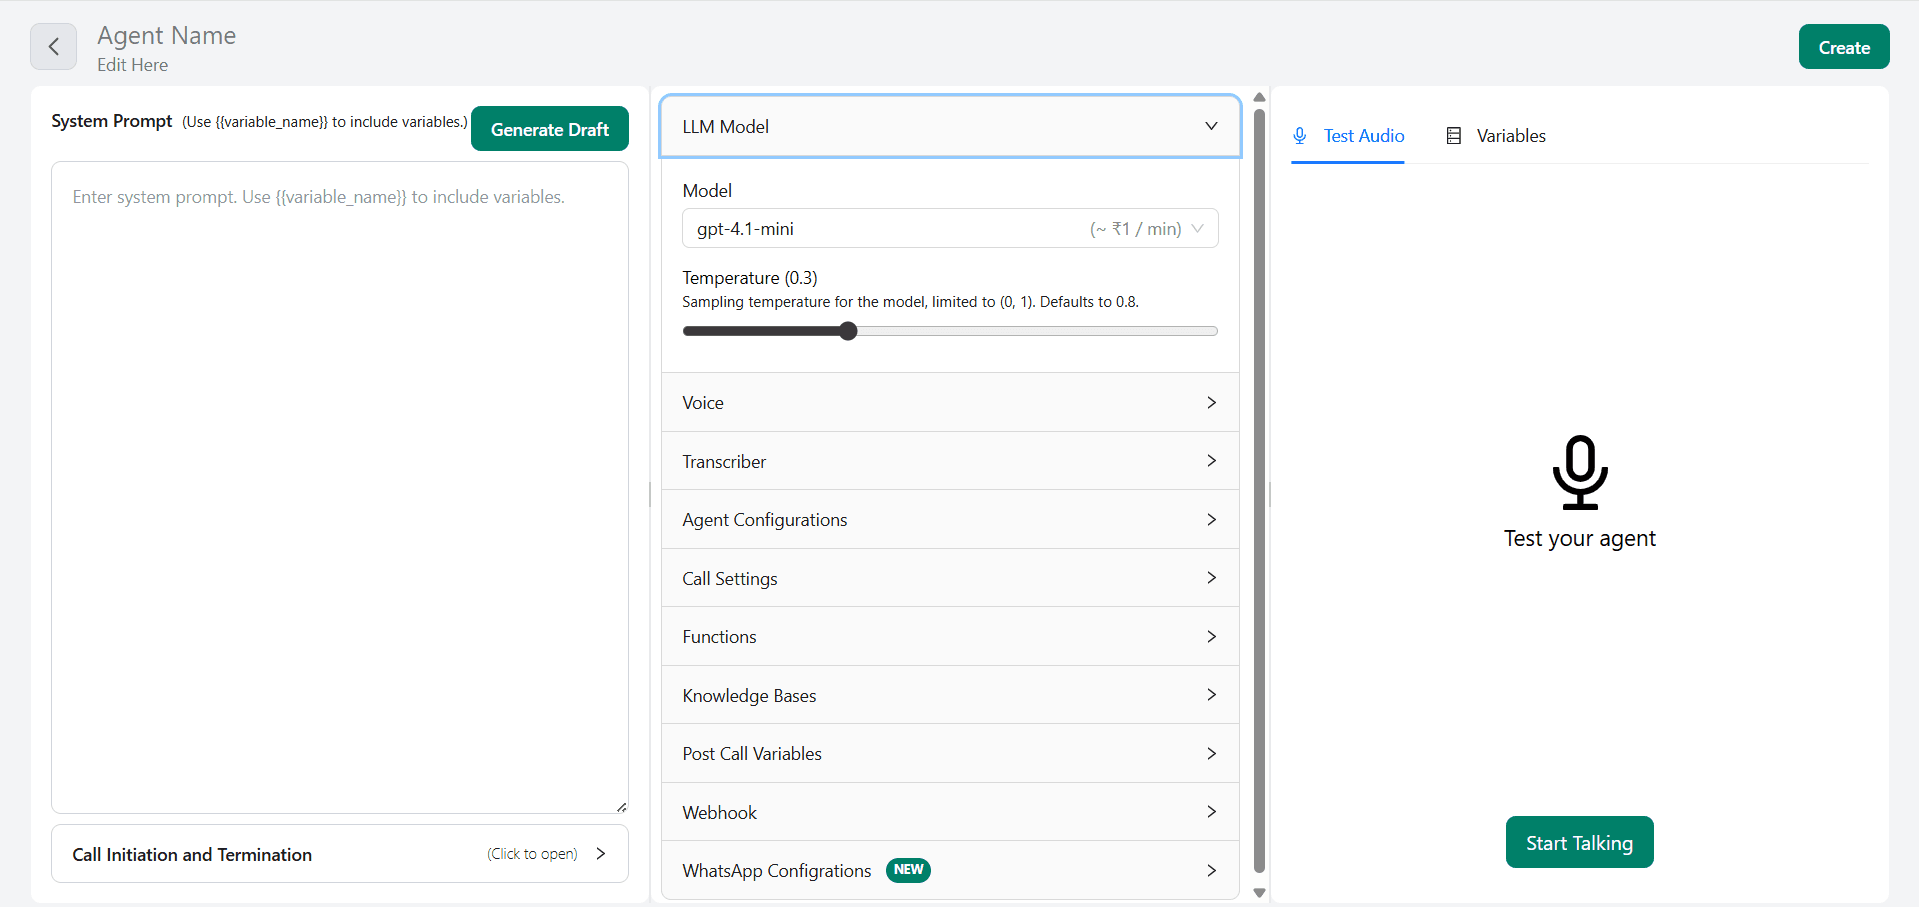
Key Sections
System Prompt
This is the brain of your agent. Write the core instruction or script here. You can also insert dynamic fields using variables. You can click Generate Draft to get a starter script.LLM Model
Choose the AI model that will power your agent. Full models (like gpt-4.1) are better for natural conversations, while mini versions are faster and cheaper for short, structured flows.Voice
Pick a voice that suits your audience. You can choose from multiple tones and languages (like Ananya for Hindi, Jessica for English, or Raju for relatable Hindi).Transcriber
Enable transcription so you capture everything the customer says during a call. This helps in analysis and reporting.Agent Configurations & Call Settings
Define how your agent behaves on a call. Call settings include when the call starts, how it ends, and what to do if the user doesn’t respond.Functions & Knowledge Bases
Add integrations or connect knowledge sources so the agent can answer FAQs, pull product info, or verify details during calls.Post Call Variables
Capture results after the call (like “call_status” or “conversion_status”) to push into your CRM or analytics.Webhook
Set up webhooks to send real-time updates about call events (for example: when a user answers, hangs up, or confirms a payment).WhatsApp Configurations
Link your agent to a WhatsApp number identity so that calls show up with the right WhatsApp phone mapping. This keeps branding consistent.
Testing Your Agent
On the right side, you’ll find Test Audio and Variables. You can click Start Talking to try your agent live and confirm that the system prompt, voice, and call flow sound natural.
Phone Numbers, health and routing in one place
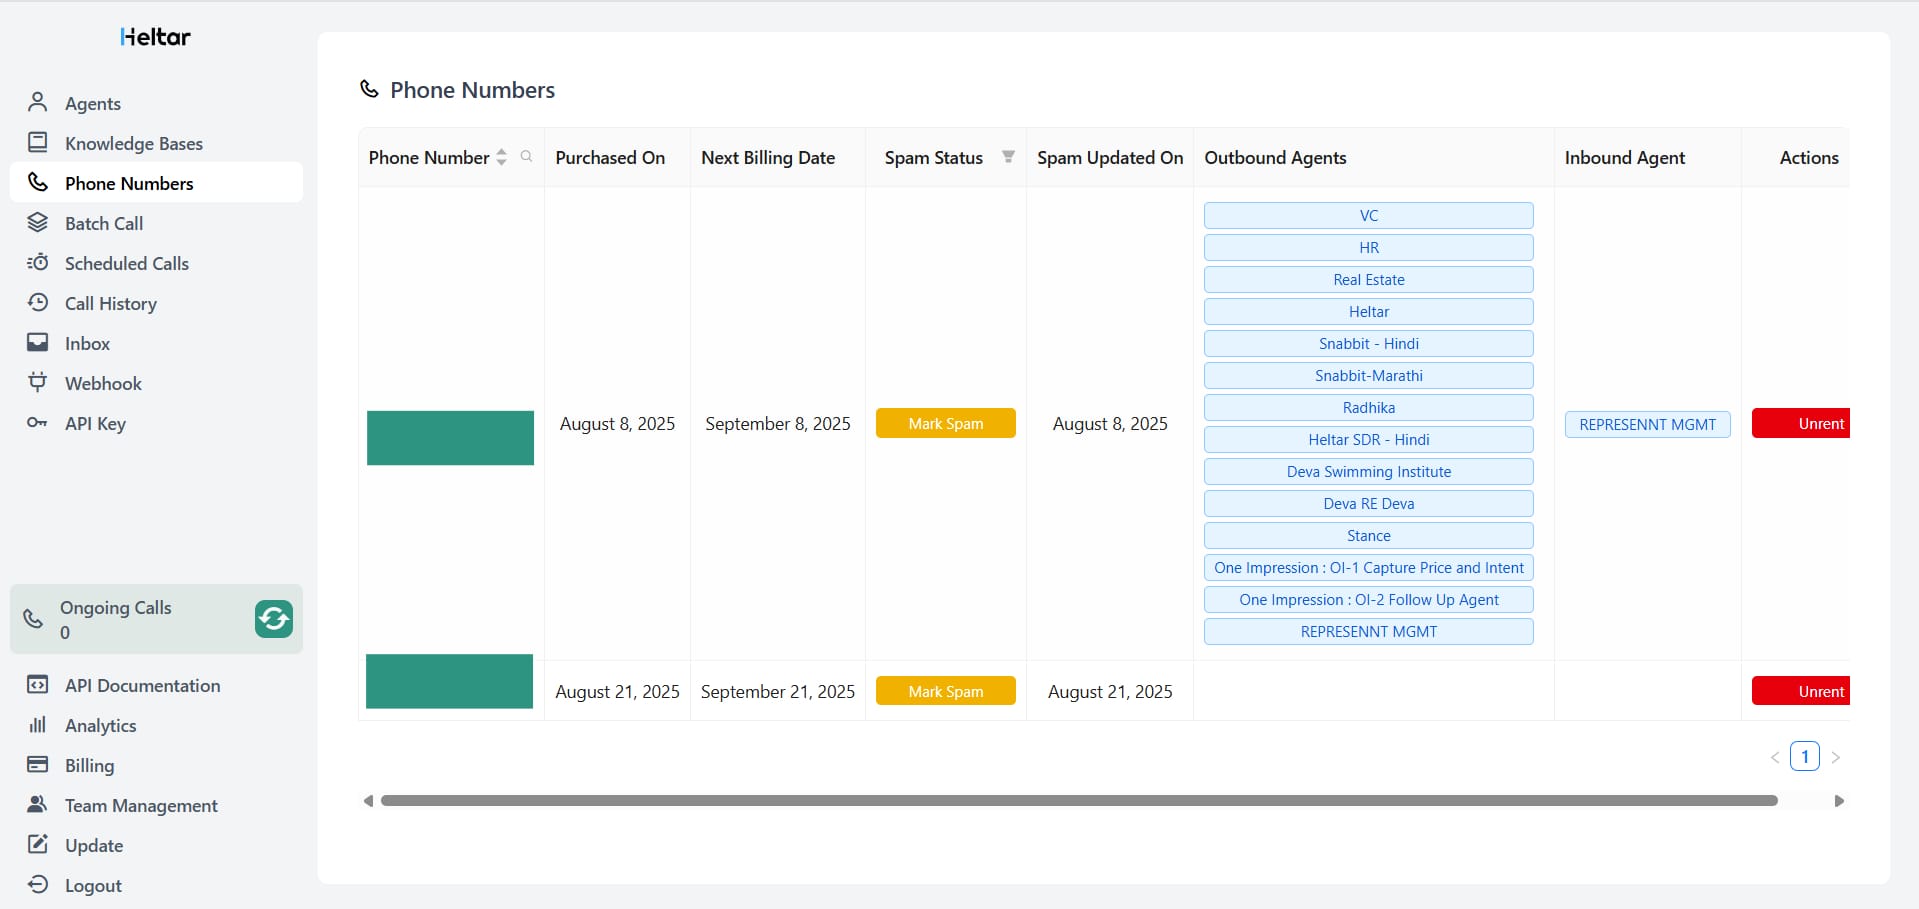
Where: Phone Numbers in the left menu
What you see per number
Phone Number
Purchased On and Next Billing Date
Spam Status with a Mark Spam button and Spam Updated On date
Outbound Agents, shown as blue tags like VC, HR, Real Estate
Inbound Agent, one blue tag such as REPRESENTN MGMT
Actions with an Unrent button
What it means
- Outbound Agents list shows every agent allowed to dial from this number. You can add many.
- Inbound Agent is the single agent that will answer to this number.
- Mark Spam is for your internal status. Use it to flag that carriers or apps started marking the number. It helps your team act fast, switch numbers, or spread load.
- Unrent releases the number when you are done.
- Good habits
- Keep one clean number per brand or line of business.
- Rotate numbers for very large batches to keep answer rates steady.
- If spam spikes, pause heavy campaigns on that number and use the Mark Spam note so others see the status.
Batch Call, launch and measure campaigns
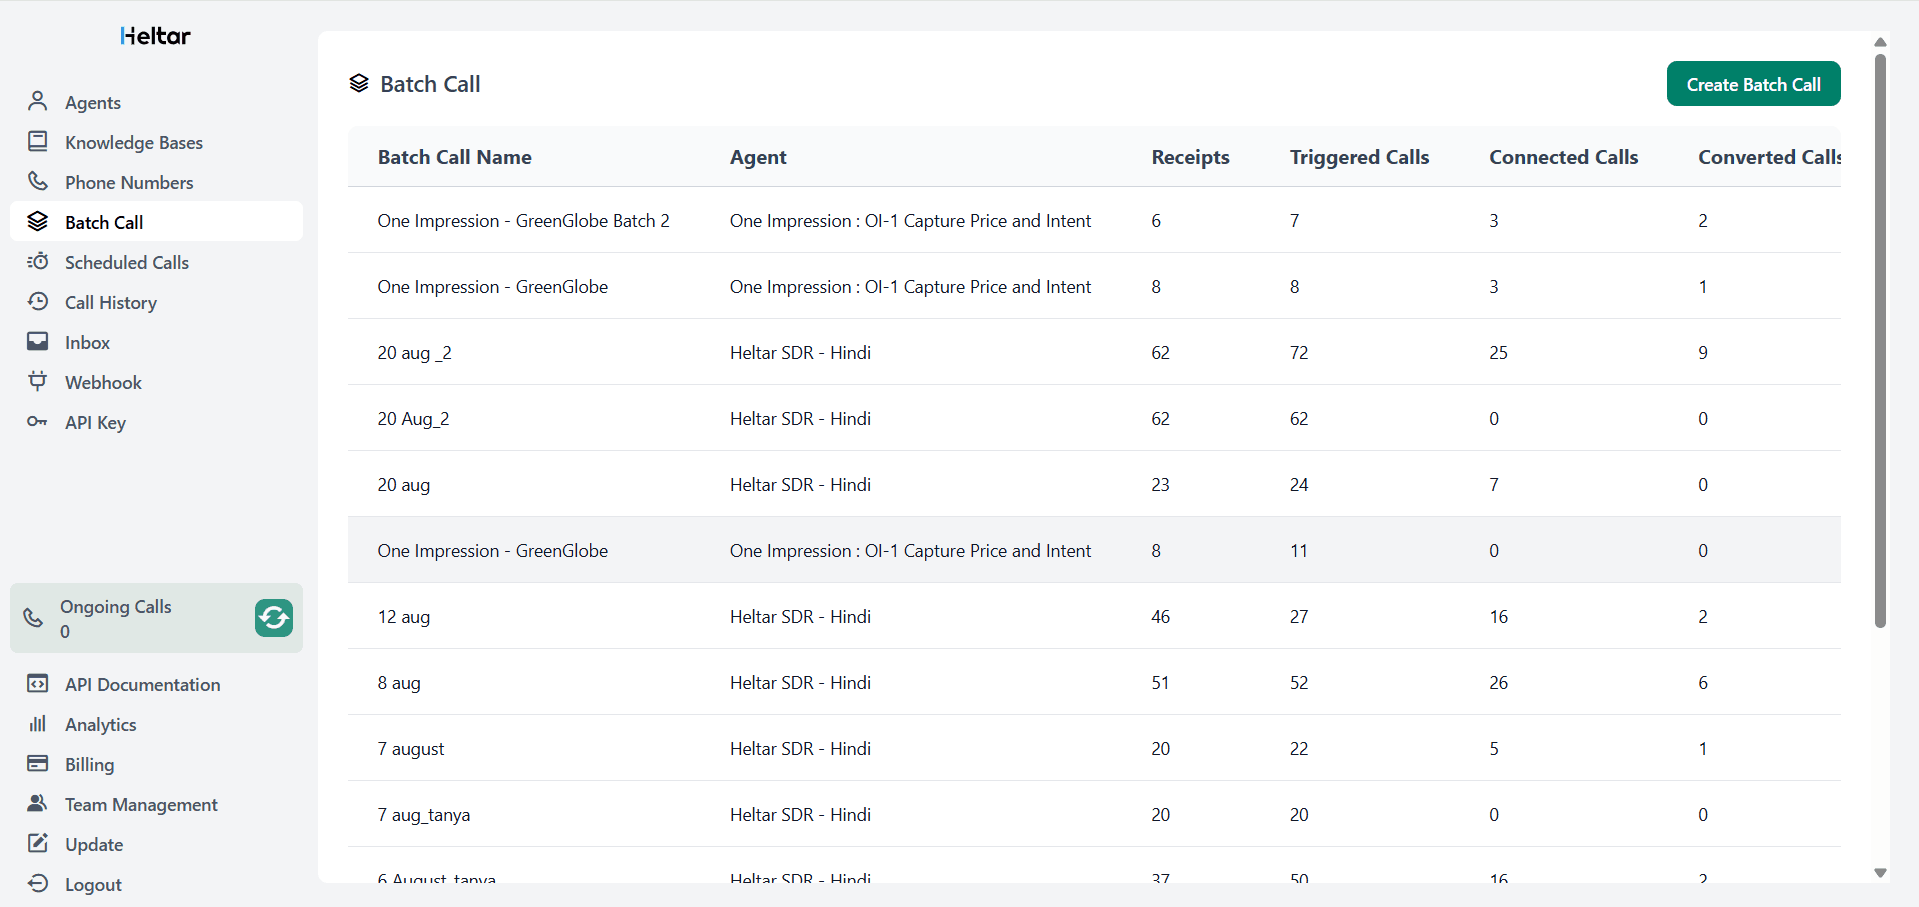
Where: Batch Call in the left menu
List view columns
- Batch Call Name
- Agent used for that batch
- Receipts, rows received from your CSV
- Triggered Calls, calls the system attempted
- Connected Calls, actually answered
- Converted Calls, calls that met your success rule
Why these matter
- Receipts vs Triggered tells you if any rows were filtered out or if retries increased attempts.
- Connected shows your real answer rate.
- Converted is your north star. You choose what counts as a conversion in your flow or via webhook logic, for example demo booked, COD confirmed, reminder acknowledged, NPS recorded.
Create a Batch Call
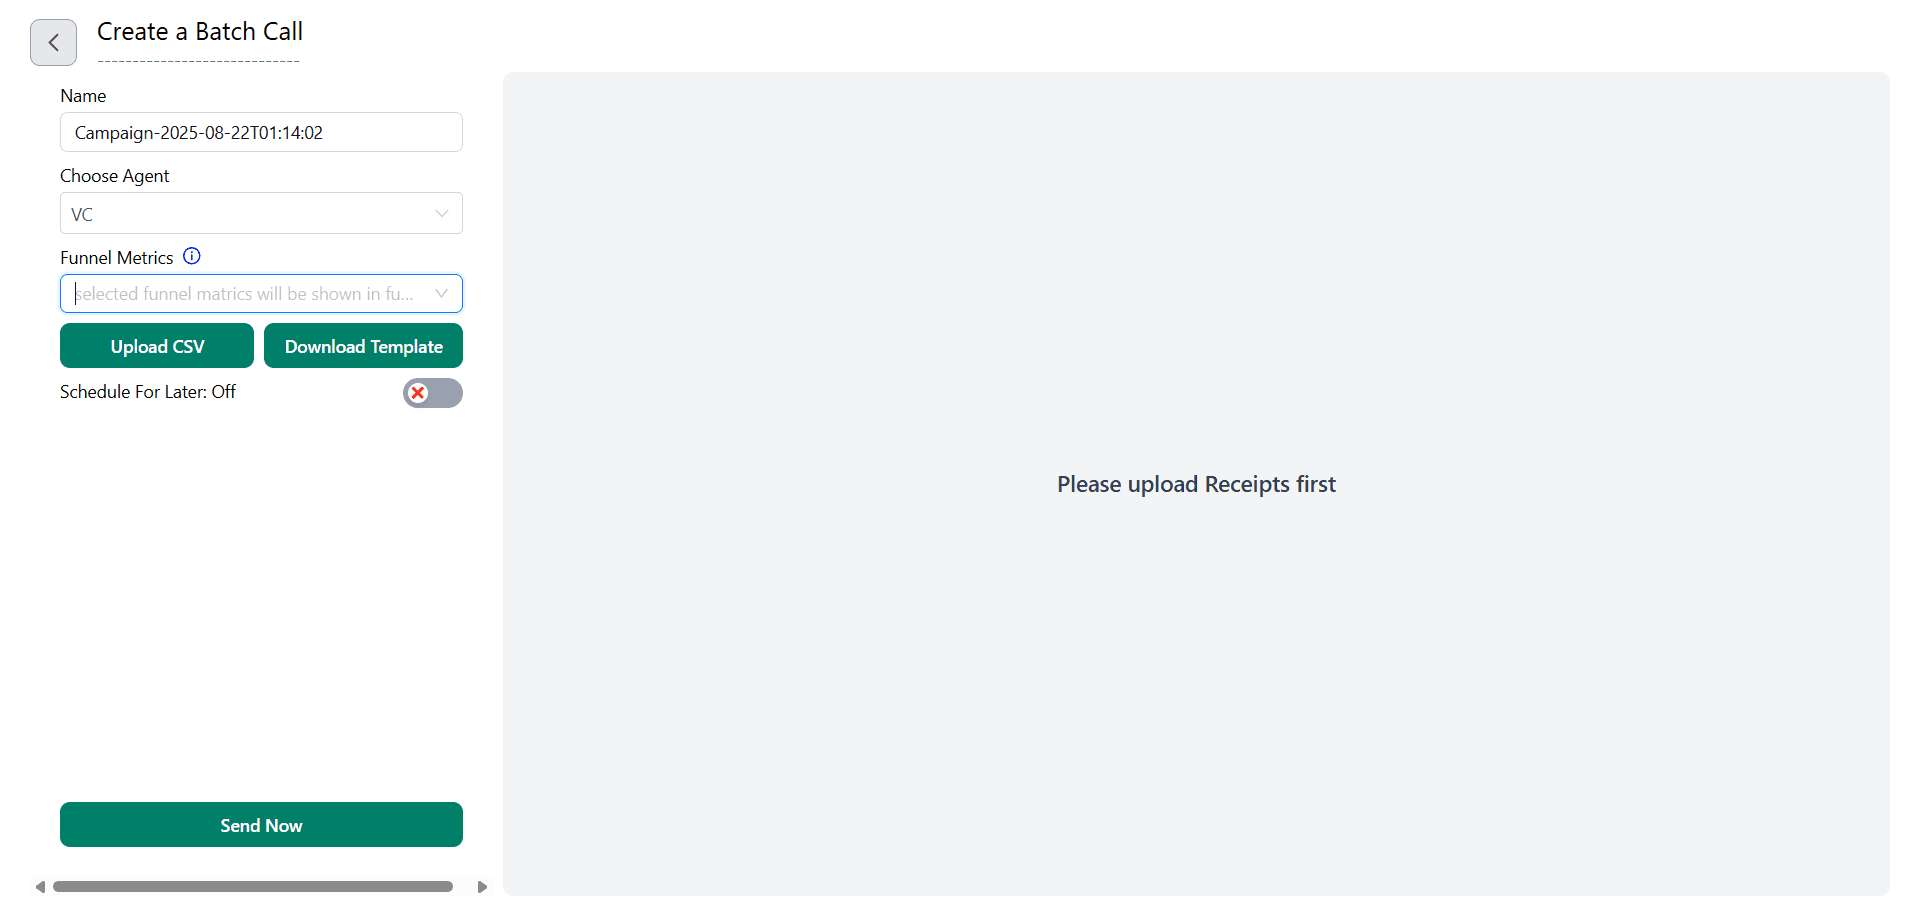
Open Create a Batch Call and fill these:
- Name - Auto-generated, you can rename to something readable.
- Choose Agent - Pick the voice bot that will speak.
- Funnel Metrics - Select which counters you want to see in the funnel view for this batch.
- Upload CSV
Click Download Template first to see the required columns.
- The template shows the exact header format Heltar expects. Phone number is mandatory. Add any columns you plan to use in the script, such as name, order id, city.
- Keep country codes in E.164 format, for example 9198xxxxxxx for India.
- Schedule For Later - Toggle on to pick a send time, or keep it off and press Send Now.
- Scheduled Calls
- The Scheduled Calls page lists queued jobs with Job ID, Schedule ID, Agent, To Number, Scheduled At, and Metadata.
- If the list is empty, it means nothing is queued right now.
Inbox, quick view of inbound
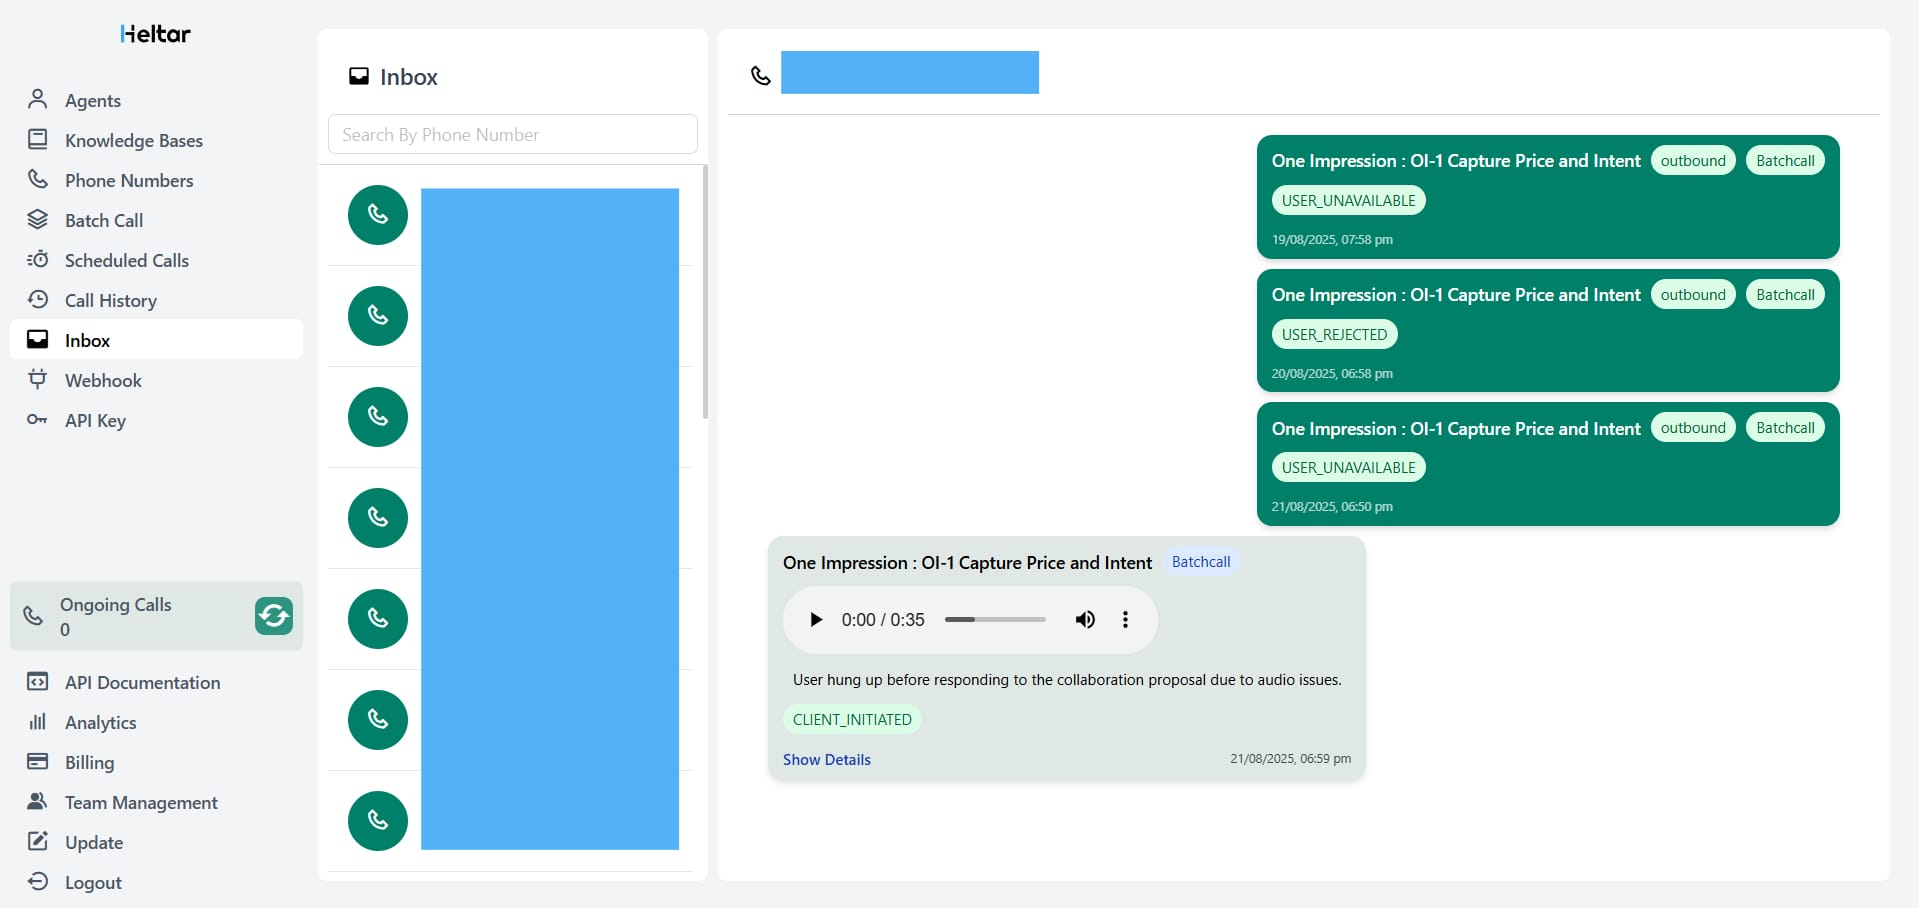
Where: Inbox in the left menu
What you see
- A list of phone numbers with a call icon and a timestamp line such as 21-08-2025T11:55:33
- Indepth Call Recordings of any call you wish to see and listen
Use it for
- Spotting live inbound calls and calling back the ones you missed
- Simple monitoring without going into filters
- You can also search by phone number at the top, and assess any call(s) you wish to
Call History, every attempt with rich filters
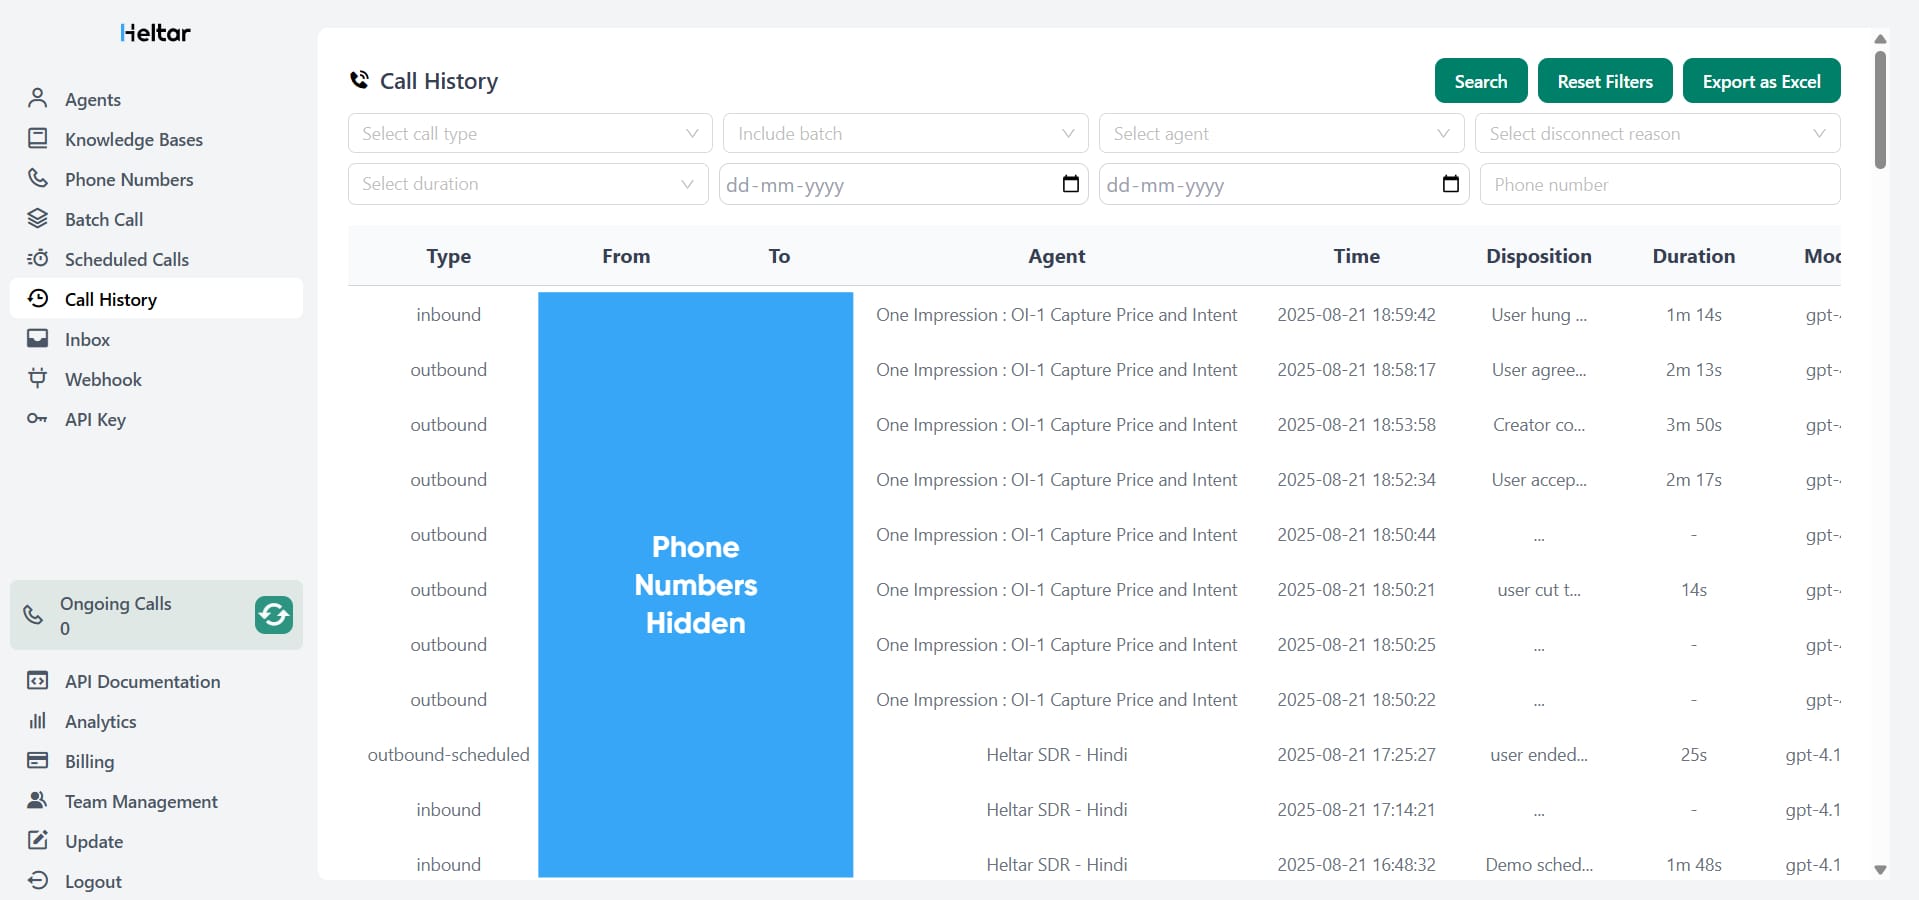
Where: Call History in the left menu
Filters you can use
- Call type
- Inbound
- Outbound
- Outbound API
- Outbound Scheduled
- Agent Test
- Include batch - Find calls that belong to a specific campaign name.
- Date range - Start date and end date pickers.
- Agent - Limit to a single agent, helpful when you A/B test scripts.
- Disconnect reason
Client Initiated
- Participant Removed
- Session Timeout
- Voicemail Detected
- User Rejected
- User Unavailable
- User Unresponsive
- Invalid Phone Number
Duration
Not Connected
- 1-10s
- 11-30s
- 31-60s
60s+
Table columns
- Type, inbound or outbound flavor
- From and To
- Agent
- Time
- Disposition, short text such as “user hung…”, “Demo sched…”, etc
- Duration
Click Search to apply filters, Reset Filters to clear, and Export as Excel to download your result set.
How to use the filters to learn fast
- Filter Duration >60s and Connected calls to listen or review the longest calls for quality.
- Filter Invalid Phone Number to clean your lists.
- Filter Outbound API to measure programmatic calls started by your systems.
- Filter User Rejected and User Unavailable to tune retry rules and call windows.
Webhook and API, connect your stack
Where: Webhook, API Key, API Documentation in the left menu
What to expect
- API Key lets your backend start single calls or batches, and tag them so they appear as Outbound API in Call History.
- Webhooks post events to your URL, for example call started, connected, ended, final disposition, and conversion.
- API Documentation shows request and response formats.
Typical loop
- Your CRM pushes a new lead to Heltar with the API.
- Heltar calls the user with your chosen agent and voice.
- On success or failure, Heltar hits your webhook with the event and any captured fields.
- Your CRM updates the record, books a meeting, or creates a task for a rep.
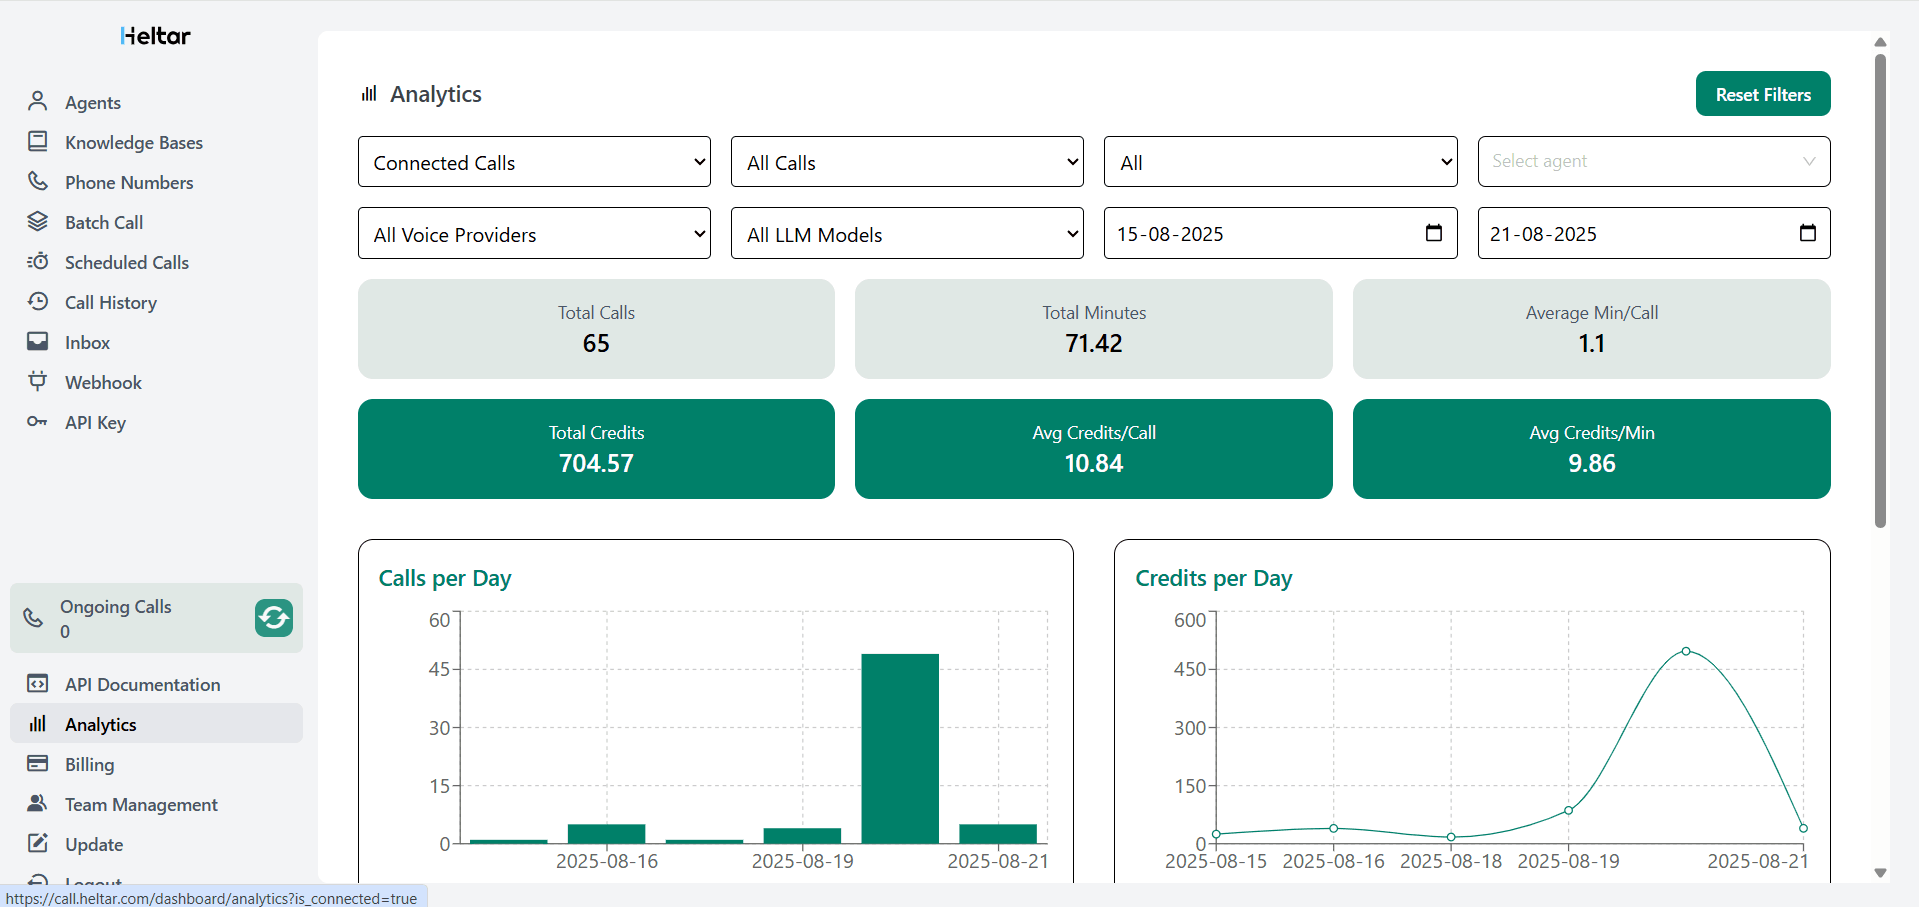
Ongoing Calls, Analytics, Billing, Team
- Ongoing Calls widget on the left shows the live count with a refresh button.
- Analytics helps you review trends such as answer rate and conversion by campaign.
- Billing shows usage and the next billing dates you already saw on the Phone Numbers page.
- Team Management lets you invite teammates and keep access tidy.
What counts as a conversion?
You define it in your flow or downstream logic. Common choices:
- Lead qualified, for example user confirmed need and budget
- Meeting booked
- Order or COD confirmed
- NPS recorded
- Reminder acknowledged with a firm date
This is why Converted Calls on the Batch Call page is the key number to track.
Example use cases you can run today
- Lead qualification in Hindi or English after a form fill
- Demo booking with calendar slots sent by SMS or WhatsApp after the call
- COD confirmation to cut RTO
- EMI or payment reminders with yes or no capture
- Event reminders and RSVP
- Short surveys or NPS
Simple setup guide, start to first results
- Create an agent - Pick a model and a voice that fits your audience. Set the Outbound Phone Number, set the Inbound Agent if you want to accept calls, and set the WhatsApp Phone mapping.
- Link numbers - In Phone Numbers, confirm the agent appears under Outbound Agents for the number you plan to use. Confirm the inbound agent for numbers that will receive calls.
- Prepare the CSV - Download the template from Create a Batch Call. Fill it. Keep numbers in the right format. Add any columns you will reference in the script.
- Create a batch - Choose the agent, upload the CSV, pick Funnel Metrics, schedule or send now.
- Watch the funnel - Use Batch Call for the high-level view and Call History for detail. Export to Excel if you need to share results.
Practical tips
- Pick voices that match the user’s language. The voice list shows clear Hindi options.
- Keep scripts short. Ask one question per step.
- Use the Agent Test call type while tuning.
- Keep number reputation clean. If spam risk rises, mark it on the number and spread load.
- Always get consent and follow local rules for automated calls.
Get this for your business today!
With Agents, Phone Numbers, Batch Call, Call History, and the API, Heltar gives you a one stop solution to run WhatsApp voice calls at scale. Contact us for a demo.