Imagine this scenario: Someone fills out your contact form, and within seconds, they receive a call. "Hello, am I speaking with Prashant?" "Yes, this is Prashant." "Great, Prashant. This is Avyukt from Heltar. Am I reaching you at a good time?"
The caller thinks they're speaking to your sales rep, but it's actually your AI assistant handling the entire conversation naturally and professionally. And the best part? It all happens automatically, no manual intervention needed.
This isn't science fiction, and it's not complicated to set up. In this comprehensive guide, we'll show you exactly how to create a voice agent that can make calls, talk to customers, follow up with them, and respond instantly, all without writing a single line of code. It saves time, keeps your customers engaged, and ensures you never miss a lead.
We searched the web for clear, step-by-step information on building AI voice agents with n8n, but found most guides were either too technical or skipped critical steps. So we built the entire workflow ourselves and documented every single step to make it easy for you to follow along.
Contents
- What you will build?
- What you need?
- How will the flow work? (Quick Overview)
- Part 1: Create Your AI Voice Agent on Retell AI
- Step 1 - Create your Retell AI account
- Step 2 - Set up your voice agent
- Step 3 - Add the agent response script
- Step 4 - Set up functions and knowledge base
- Step 5 - Get a phone number for your agent
- Part 2: Automate the Voice Agent with n8n
- Step 1 - Get n8n hosting
- Step 2 - Set up n8n
- Step 3 - Import the workflow template
- Step 4 - Connect the voice agent to the workflow
- Why businesses need a provider to do this for them?
- Bottom line
What you will build?
By the end of this guide, you will have:
- AI voice agent that can conduct natural phone conversations with customers
- Automatic call triggering when someone fills out your contact form
- Intelligent conversation flow with context awareness and memory
- Call functions including call transfer, SMS sending, and call ending
- Knowledge base integration so the AI knows your business details, pricing, and policies
- CRM logging that records all calls and transcripts
Your AI agent will be able to:
- Answer customer questions about your services
- Qualify leads by asking relevant questions
- Transfer calls to human agents when needed
- Schedule follow-ups and callbacks
- Send confirmation messages
- Handle objections and provide information
What you need?
Retell AI account
A voice AI platform specifically designed for building human-like voice agents. You get $10 in free credits to start testing.
n8n hosting
You need a place to run your automation workflows. We recommend WebSpace Kit for the best value ($5/month with unlimited workflows) over n8n Cloud ($24/month with limited features).
OpenAI API key
For the AI model that powers conversations. GPT-4o Mini works great for most use cases and is cost-effective.
Phone number provider credentials
Retell AI includes phone number provisioning, so you don't need a separate Twilio account.
A website with a contact form
To trigger the voice agent when leads submit their information.
Payment method
Required to activate your Retell AI account and use the free $10 credits (you won't be charged until you exceed the free amount).
How will the flow work? (Quick Overview)

Here's the complete journey your voice agent workflow will follow:
- Customer fills out your website contact form with their name, phone number, and inquiry details.
- n8n receives the form submission via webhook.
- n8n sends the customer data to Retell AI via API.
- Retell AI immediately calls the customer's phone number.
- AI agent engages in natural conversation, asking questions and providing information.
- AI accesses knowledge base to answer questions about your business accurately.
- AI performs functions like transferring calls to humans or sending follow-up SMS.
- Call transcript saves to your database or CRM for review.
- Team gets notified of qualified leads that need follow-up.
The entire process happens in seconds, creating an instant connection with your leads while they're still engaged.
Part 1: Create Your AI Voice Agent on Retell AI
Step 1 - Create your Retell AI account
What is Retell AI?
Retell AI is a specialized voice AI platform that lets you build and deploy human-like voice agents without coding. It handles the complex telephony, speech recognition, and voice synthesis, so you can focus on the conversation logic.
Create your account
- Go to retellai.com.
- Click "Try for Free".
- Sign in using your Google account for quick access.
- Enter your phone number when prompted.
- Click Continue.
- Enter the OTP (one-time password) you received via SMS.
- Click Continue again.
You now have a Retell AI account with $10 in free credits, enough to test 100-200 calls depending on duration.
Step 2 - Set up your voice agent
Now we'll configure how your AI agent sounds and responds.
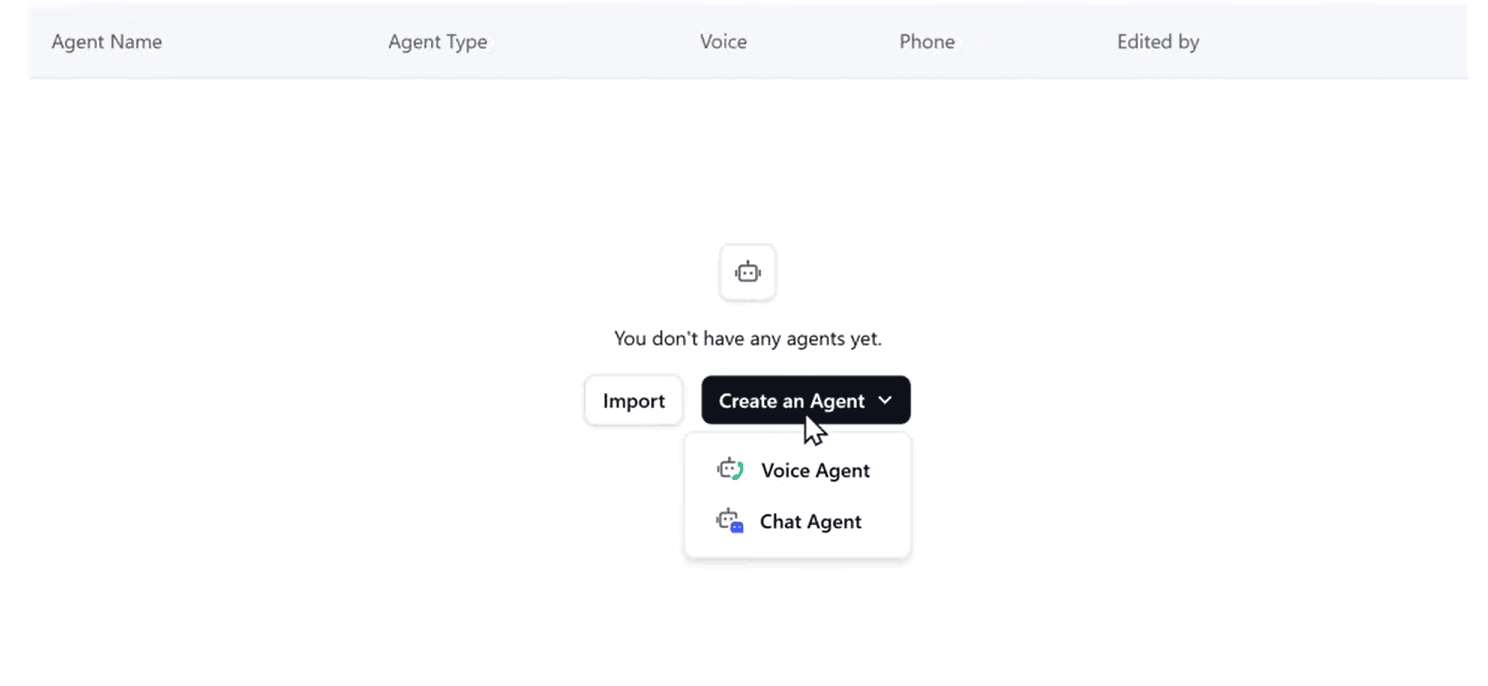
Create a new agent
- From the Retell AI dashboard, click "Create Agent".
- Select "Voice Agent" from the options.
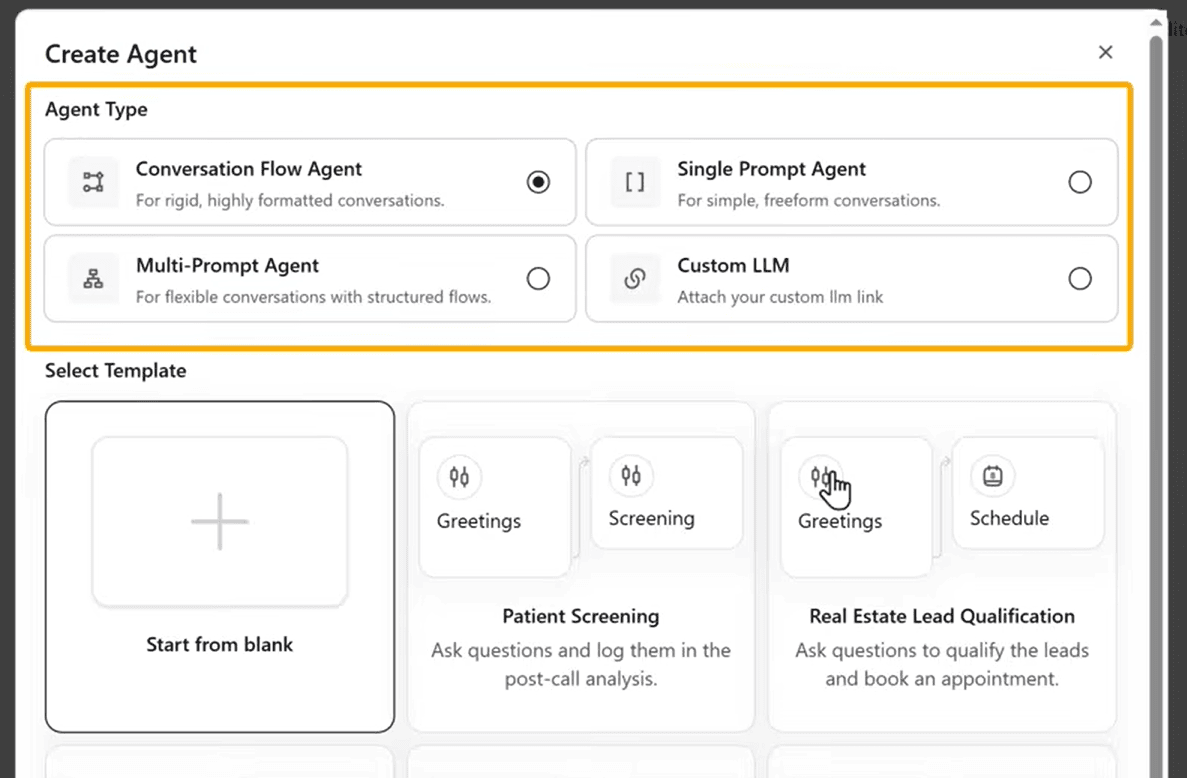
Choose your agent type
Retell AI offers four types of agents, each optimized for different use cases:
- Single Prompt Agent: Best for quick, focused tasks with one clear goal (e.g., appointment booking, lead qualification). Uses one instruction set.
- Conversation Flow Agent: Ideal for complex conversations with multiple decision points and branches.
- Multi-Prompt Agent: Suited for longer calls with multiple distinct phases (greeting, qualification, pitch, closing).
- Custom Agent: For advanced users who want full control over the logic.
For most use cases, select "Single Prompt Agent". This is perfect for lead qualification, customer support, and appointment setting.
Choose "Start from Blank" and click Create.
Select the AI model
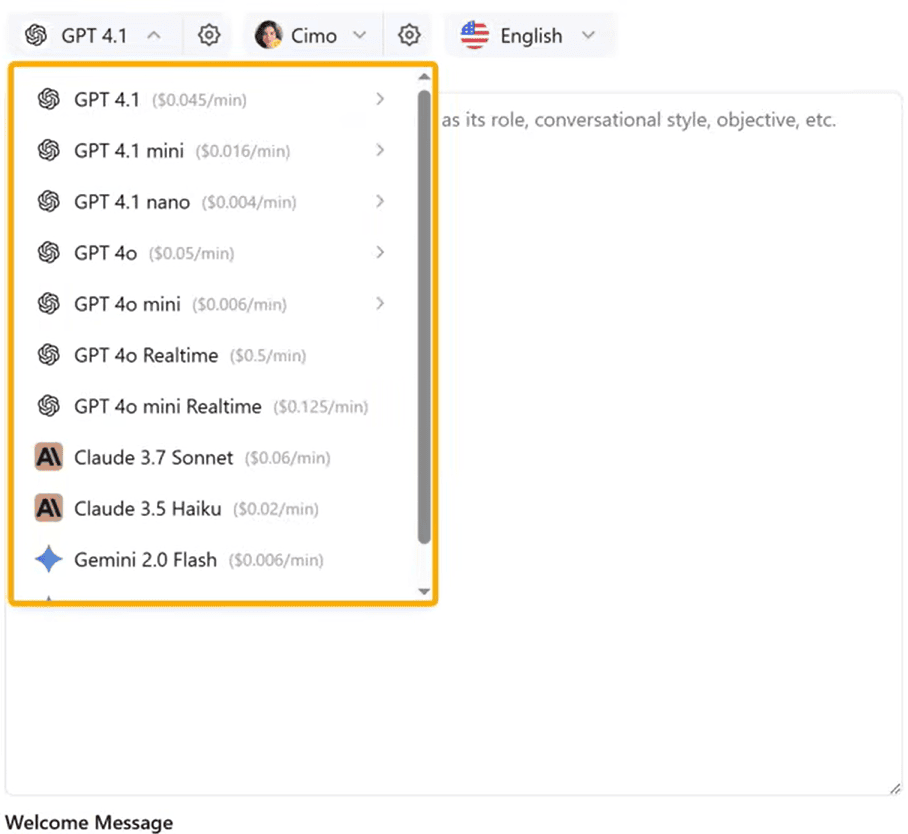
This determines how your agent thinks and responds.
Click on the model selection dropdown, and you'll see several options:
- GPT-4o: Most capable, best for complex conversations, slightly slower
- GPT-4o Mini: Fast, reliable, great for goal-based calls (recommended)
- GPT-3.5 Turbo: Faster and cheaper, but less nuanced
- Claude 3: Good for longer context windows
- Gemini: Strong at multilingual conversations
Recommendation: Choose GPT-4o Mini. It's fast, cost-effective ($0.15/$0.60 per million tokens), and handles most business conversations excellently. Check out the pricing for Open AI API and Anthropic API here.
Choose the voice
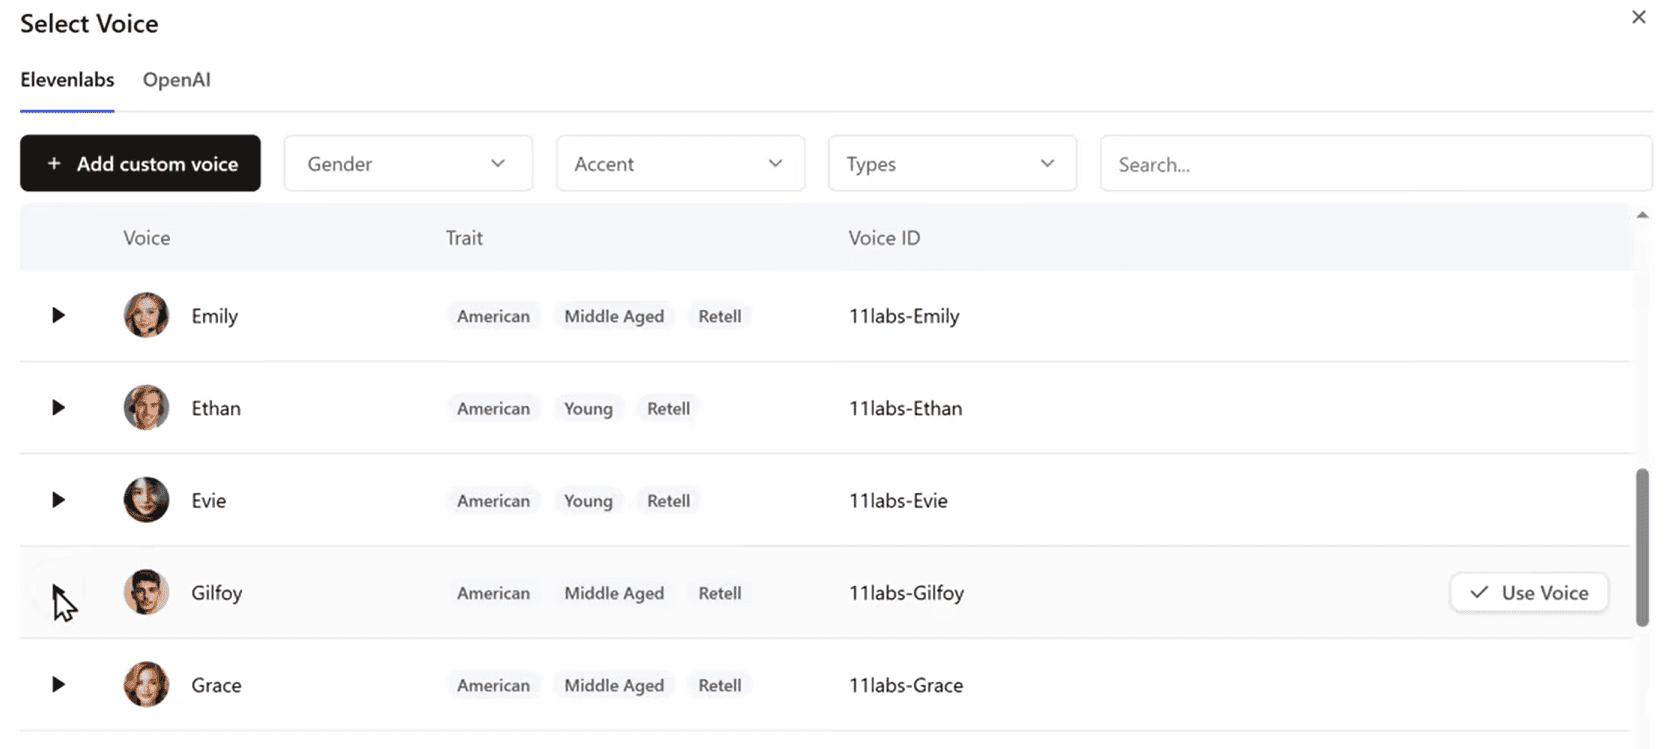
This is how your agent will sound to callers. Retell AI offers a variety of voices with different:
- Accents (American, British, Australian, etc.)
- Tones (professional, friendly, warm, authoritative)
- Speaking styles (casual, formal, enthusiastic)
Browse the voice options by clicking on each one. You'll hear a preview:
"Hi, I'm Alex. Need a hand with something? Just let me know how I can make your day a bit easier."
Pro tip: Choose a voice that matches your brand personality. For B2B sales, professional voices work best. For consumer brands, friendly and warm voices create better connections.
Select your preferred voice and click Save.
Step 3 - Add the agent response script
This is the most important step. The response script tells your AI agent exactly how to conduct conversations, including:
- How to introduce itself
- What questions to ask
- How to handle objections
- When to transfer to a human
- How to end calls
If you know exactly how you want your agent to behave, you can write the prompt directly in the text box. Make it clear and specific. Else, You can take AI's help to craft a good script that suits your brand.
Example prompt structure:
You are [Agent Name] from [Company Name]. Your goal is to [primary objective].

When the call connects:
1. Introduce yourself warmly
2. Confirm you're speaking with the right person
3. Ask if it's a good time to talk

During the conversation:
- Ask about [specific qualifying questions]
- Listen for [keywords or pain points]
- Provide information about [your services/products]
- Handle objections by [approach]

Keep responses:
- Short (2-3 sentences maximum)
- Natural and conversational
- Professional but friendly
- Clear without jargon

If the customer asks about [topic], say [response]

End the call by:
- Summarizing next steps
- Thanking them for their time
- Confirming any scheduled follow-up
Step 4 - Set up functions and knowledge base
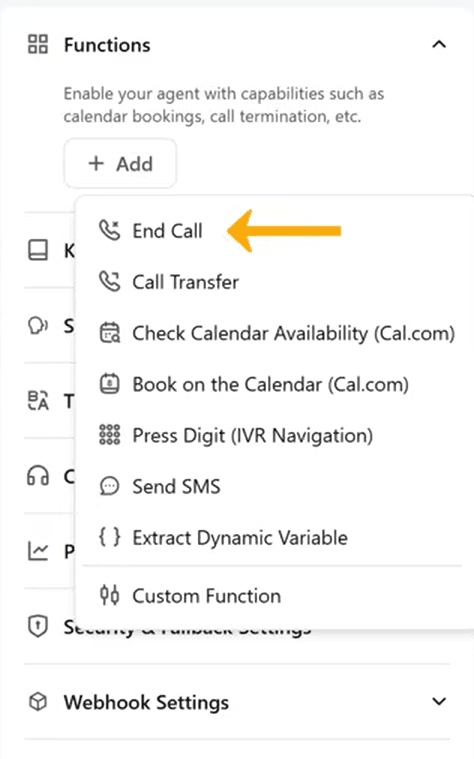
This step gives your AI agent the ability to perform actions and access information about your business.
Set up functions
Functions are specific actions your AI can perform during calls. Let's add the three most important ones.
Add End Call function
This tells the AI when and how to end conversations naturally.
- Go to the Functions section in Retell AI.
- Click Add > End Call.
- Copy the function name (usually something like end_call).
- Click Save.
- Go back to your agent prompt.
- Find the section where you describe ending calls, and add:
When the conversation is complete, use the end_call function. - Save the prompt.
Now when the conversation reaches its natural conclusion, the AI will know to trigger this function and end the call smoothly.
Add Call Transfer function
This allows the AI to transfer calls to your human team when needed.
- In Functions, click Add > Call Transfer.
- Enter the phone number where calls should be transferred (your sales line, support desk, or personal number).
- You can update this number anytime without changing the prompt.
- Copy the function name (e.g., transfer_call).
- Click Save.
- Return to your agent prompt and add:
If the customer requests to speak with a human, or if the inquiry is beyond your scope, say "Let me connect you with a specialist who can help" and use the transfer_call function. - Save the prompt.
Set up knowledge base
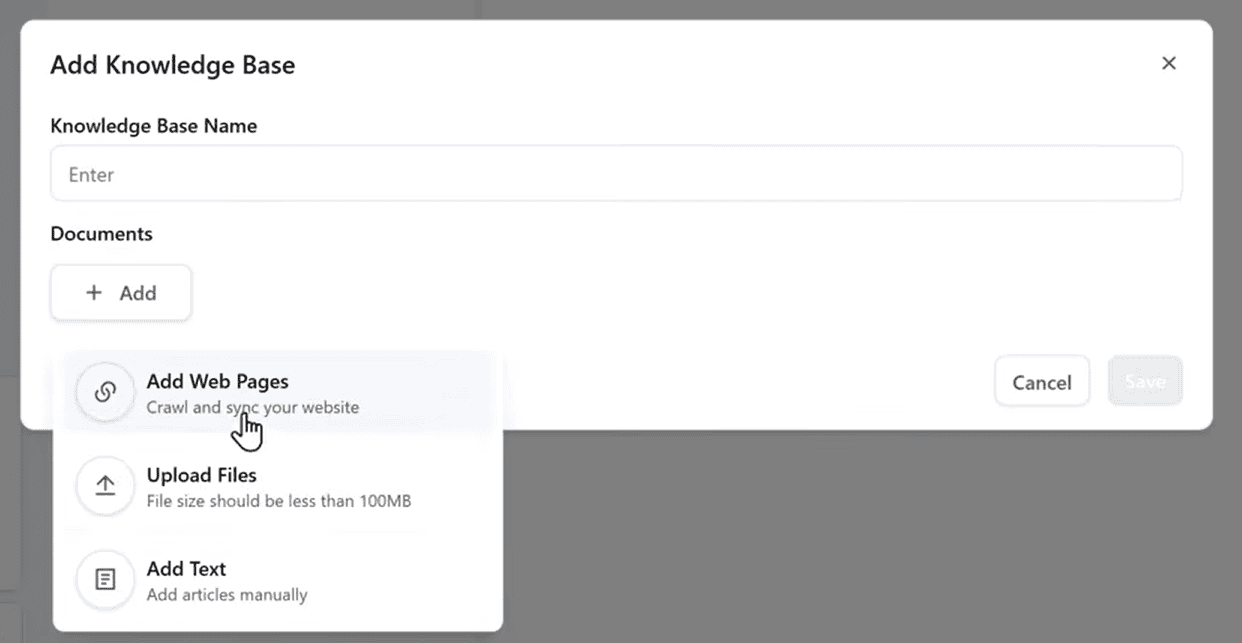
The knowledge base lets your AI access accurate, up-to-date information about your business. Without this, the AI might hallucinate or provide incorrect information.
What to include:
- Services or products you offer
- Pricing information
- Policies (refund, cancellation, privacy)
- Common questions and answers
- Company background and values
- Process overviews (how to get started, typical timelines)
Three ways to add knowledge:
Method 1: Add your website (Easiest)
- Go to Knowledge Base in Retell AI.
- Click Add > Website.
- Copy your website URL
- Paste it into the field.
- Click Save.
Retell AI will automatically crawl your website and extract relevant content as knowledge base.
- You'll see a list of sitemaps from your website.
- Select all the relevant pages (or choose specific ones).
- Click Save again.
- Give your knowledge base a descriptive name (e.g., "Company Website Content").
- Click Save.
Method 2: Upload files
Upload PDFs, Word documents, or text files containing Product catalogs, Service guides, Pricing sheets, Process documentation, Training materials.
- Click Add > File Upload.
- Choose your files (supports PDF, DOCX, TXT).
- Files are processed and made searchable.
- Name the knowledge base.
- Save.
Method 3: Enter information manually
For specific information not on your website:
- Click Add > Manual Entry.
- Type or paste the information.
- Use clear formatting with headers and bullet points.
- Save and name the knowledge base.
Link knowledge base to your agent
- Go back to your agent settings.
- Find the Knowledge Base section.
- Select the knowledge base you just created.
- Click Save.
Your AI agent can now answer questions using real information from your business, providing accurate and helpful responses.
Step 5 - Get a phone number for your agent
Your AI agent needs its own phone number to make and receive calls.
Get a phone number
In Retell AI, go to Phone Numbers in the left sidebar.
Click Get a Number or Add Phone Number.
Select your country (e.g., United States, United Kingdom, Canada).
Choose the area code you prefer.
Select a number type:
- Local: Area code-specific (e.g., 415 for San Francisco)
- Toll-free: 800, 888, 877 numbers (more professional for businesses)
- International: For global businesses
Purchase the number. This typically costs $1-2/month.
Configure call direction
Since we're building an outbound agent (calls customers after form submission), we need to set this up:
- Under Phone Number Settings, select Outbound Calls.
- Choose the agent you created earlier from the dropdown.
- Click Save.
Verify outbound calling
To prevent spam and confirm you're a legitimate business, Retell requires verification:
Click Verify Outbound Calls.
Click Start Verification.
Select your country.
Choose an ID type to verify your identity:
- Driver's License
- Passport
- Government ID
Upload front photo of your ID.
Upload back photo of your ID.
Submit for review.
Verification typically completes within 24 hours, but often much faster.
Part 2: Automate the Voice Agent with n8n
Now that your AI voice agent works, let's automate it so it calls customers automatically when they take action on your website.
What is n8n?
n8n is an open-source automation platform that connects different apps and services together without code. Think of it as a visual programming tool where you build workflows by connecting boxes (nodes) that represent different actions.
We'll create a workflow that:
- Listens for form submissions from your website
- Extracts customer information
- Sends it to Retell AI
- Triggers the voice call automatically
Step 1 - Get n8n hosting
You have three options for running n8n:
Option 1: Self-host locally (Free, but complex)
Run n8n on your own computer.
Pros:
- Completely free
- Full control
Cons:
- Complex setup with technical requirements
- Your computer must stay on 24/7
- Need to configure SSL certificates
- Port forwarding and firewall rules needed
- Not suitable for production use
Not recommended unless you're technically advanced and just testing.
Option 2: n8n Cloud ($24/month)
Official hosting by n8n.
Pros:
- Official support
- Managed updates
Cons:
- $24/month - More expensive
- Limited to 2,500 executions per month (compared to unlimited on WebSpace Kit)
- Limited active workflows
- Doesn't support all community nodes
Recommended for: Large enterprises with big budgets who want official support.
Step 2 - Set up n8n
Initial configuration
Open your n8n URL in your browser.
You'll see a setup screen.
Fill in these details:
- Email: Your email address
- First name: Your first name
- Last name: Your last name
- Password: Create a strong password
Click Next or Get Started.
You'll see the n8n interface. This is your workflow canvas where you'll build automation.
Understanding the n8n interface
Key elements:
- Canvas: The large white area where you build workflows
- Nodes: Boxes that represent actions (trigger, process data, call API)
- Connections: Arrows that show data flow between nodes
- + Button: Add new nodes to your workflow
- Execute: Test your workflow manually
- Active toggle: Turn workflow on/off for automatic execution
Step 3 - Import the workflow template
Instead of building the workflow from scratch (which takes time and is error-prone), we've created a ready-made template that you can import and customize.
Download the template
Go to WebSpace Kit.
Scroll to Voice Agent Workflow Templates.
You'll see different templates for various use cases:
- Lead Qualification Agent: For sales teams
- Appointment Booking Agent: For service businesses
- Customer Support Agent: For help desks
- Survey Agent: For feedback collection.
Click Download on the template that matches your needs.
A JSON file will download to your computer
Import into n8n
- Go back to your n8n interface.
- Click on the workflow menu (three lines or hamburger icon in top left).
- Select Import from File.
- Click Upload and choose the JSON file you just downloaded.
- Click Open or Import.
The complete workflow appears on your canvas with all nodes already configured. You'll see something like:
[Form Submission Webhook] → [Extract Data] → [Format Phone Number] → [Call Retell API] → [Log to Database]
Step 4 - Connect the voice agent to the workflow
Now we need to connect your Retell AI agent to the n8n workflow so they can communicate.
Add Retell AI credentials
- In your workflow, find the HTTP Request node (usually labeled "Call Retell API").
- Click on the node to open its settings.
- Find the Authentication section.
- Click Create New Credential or the credential dropdown.
Get your Retell AI API key
- Go back to Retell AI in another browser tab.
- Click on Settings or your profile icon.
- Go to API Keys.
- Click Generate New Key or Create API Key.
- Copy the API key
- Important: Save this key somewhere safe. You can't see it again after closing the window.
Add the API key to n8n
Return to the n8n workflow.
In the HTTP Request node credential settings:
- Name: Call it "Retell AI"
- Authentication Type: Select "Header Auth"
- Header Name: Enter
Authorization - Header Value: Enter Bearer_YOUR_API_KEY (replace YOUR_API_KEY with the actual key)
Click Save.
Configure the Retell AI call
Still in the HTTP Request node, scroll down to find these fields:
Phone Number
This is the Retell AI phone number that will make the call.
- Go to Retell AI > Phone Numbers.
- Copy your phone number (the one you purchased earlier).
- Return to n8n.
- Paste the number in the from_number field.
Agent ID
This tells Retell which agent to use for the call.
- Go to Retell AI > Agents.
- Click on your agent (the one you created earlier).
- In the agent details, find the Agent ID.
- Copy the Agent ID.
- Return to n8n.
- Paste it in the agent_id field.
Dynamic customer data
The workflow should automatically pull customer information from the form submission. Check that these fields use expressions:
- to_number: { { $json.phone } } - The customer's phone number from the form
- customer_name: { { $json.name} }- The customer's name
- metadata: Any additional data you want to pass (email, company, inquiry type)
Save and test
- Click Save on the HTTP Request node.
- Click Save on the workflow itself (top right).
- Give your workflow a clear name: "Voice Agent - Lead Calls"
Test the workflow manually
Before connecting it to your website, test that everything works:
Find the Webhook node (usually the first node).
Click on it.
Click Execute Node or Listen for Test Event.
The node will wait for data.
Use Postman or send test data directly in n8n:
- Click Test Step or Execute Workflow
- Enter sample data:
{ "name": "Brian Smith", "phone": "+14155551234", "email": "brian@example.com", "message": "Interested in your services"
Click Execute.
What should happen:
- Each node turns green as it executes
- Your phone should ring within 5-10 seconds
- The AI agent should start the conversation
- After the call, you'll see the call data in the last node
Why businesses need a provider to do this for them?
Heltar is building voice AI infrastructure designed specifically for production business use.
What Heltar provides?
Shared team interface:
- Central dashboard for reviewing all calls
- Transcript search and filtering
- Collaborative annotations and notes
- Call assignments to team members
- Real-time call monitoring
Conversation intelligence:
- Pre-built conversation flows for common use cases (sales, support, booking)
- Visual flow builder with drag-and-drop
- Intent recognition and routing
- Automatic sentiment analysis
- Smart context management across calls
Built-in integrations:
- Native CRM connections (Salesforce, HubSpot, Zoho)
- Calendar systems (Google, Outlook, Calendly)
- Support tools (Zendesk, Intercom, Freshdesk)
- Marketing platforms (Mailchimp, ActiveCampaign)
- Databases and webhooks
Advanced analytics:
- Real-time performance dashboards
- Conversion funnel analysis
- Cost per call and per conversion
- Agent performance comparisons
- Call quality scores
- Trend analysis and forecasting
Professional features:
- Multi-language support with native accents
- Smart call routing and IVR
- SMS and email integration
- A/B testing framework
Questions or need help? Drop us a message, and our team will guide you through setting up voice AI for your specific use case. We love helping businesses automate and scale with AI, and we're here to make your journey smooth and successful.